When raising poultry on a private farm or farm, an incubator for artificial hatching is essential. For small numbers of eggs, purchasing one is impractical. Therefore, many poultry farmers familiar with the device's operation prefer to make their own.
If you're handy with tools, building an incubator won't be difficult, especially since it's cost-effective. The entire hatching process will be supervised, and the chicks will grow up healthy and strong.
Advantages of homemade incubators
Many poultry farmers believe that the incubator is a complex device, so making one yourself at home is unrealistic. In fact, making an incubator yourself is quite simple and can be done with minimal expense.
When making your own device, you can choose the desired dimensions and add necessary features, such as temperature control or egg turning. Since such a design will be made from practically any materials available, it it will be economically profitable, which is one of the advantages of the device.
Other benefits of a homemade incubator include:
- reliability in use;
- the possibility of breeding various species of birds;
- obtaining chicks within the required time frame;
- ensuring survival rate of young animals up to 90%;
- independently selected sizes for laying the required number of eggs.
- low power consumption.
Preparatory work
 No special materials or tools are required to construct the structure. Materials found in almost every home will do.
First of all, it is necessary decide on the dimensions of the device For hatching chicks. They depend on the type of bird being raised, the number of young birds, and the incubator's location. For example, a structure for quail eggs should be smaller than for chicken and duck eggs. The slope of the trays, which should be different for each bird species, is also taken into account.
To provide the eggs with constant heat and the necessary humidity, it is best to make an incubator with a frame, which can be homemade or taken from an old refrigerator.
The main components of the incubator are:
- body with insulation;
- egg trays;
- heating system;
- devices for monitoring temperature and humidity in a structure.
Making incubators yourself
At home, you can make a frame from cardboard boxes, a basin, chipboard sheets, foam, and wooden beams. With a little imagination and the materials at hand, you can create a high-quality incubator.
From a basin or bowl
The easiest-to-make device for raising chickens should only be used if power outages are a possibility. An incubator is made from two containers of the same size, which can be basins or bowls. Preferably, they should be made of metal.
The bowls are stacked one on top of the other, secured at one end with furniture hinges or other devices. There should be space between the bowls to accommodate the eggs. The top bowl in this design will serve as a lid. Since the bowls are round, the eggs will heat evenly.
A 2-cm layer of sand is poured into the bottom bowl and covered with foil. Hay or straw is placed on top. To allow moisture to evaporate, several holes are made in the foil.
The top bowl will accommodate a socket, for which a hole must be made. If the container is large, several bulbs will be needed.
A thermometer should be placed in the center of the assembled structure at the height where the eggs will be. The incubator is installed in a location where constantly the same temperatureThen it should be warmed up, after which it can be filled with quail, chicken or other bird eggs.
If the power goes out at home, cover the device with a blanket and place it in a pot of warm water. In summer, it can be placed in the sun, and in winter, it can be placed near a radiator.
The sand in this structure serves as a humidifier and heat accumulator, so it needs to be moistened regularly. The eggs should be turned and sprayed daily.
Incubator out of a box
You can make such a cost-effective device yourself quite quickly.
Manufacturing stages:
 A hole is cut in the lid of the box for the light bulbs, and 1 cm holes are cut in the side edge for ventilation.
- Three or more 25-watt bulbs are inserted, depending on the box's dimensions. They are positioned 15 cm from the tray.
- All edges of the box are covered with chipboard sheets or plywood.
- From the inside, the box is insulated with foam plastic.
- A water container is fitted to maintain humidity in the incubator.
- A tray with chicken or quail eggs is placed on foam plastic at a height of 10 cm from the bottom of the box.
- It is advisable to make the lid glass and place it tightly on the box.
- The thermometer and gyroscope are attached so they can be seen without opening the incubator. Opening the incubator is only permitted to turn the eggs.
 A hole is cut in the lid of the box for the light bulbs, and 1 cm holes are cut in the side edge for ventilation.
Styrofoam incubator
Almost every home has good thermal insulation material. Therefore, making a DIY incubator for chicken or quail eggs out of polystyrene foam is not difficult. What's more, you can choose the size yourself.
Manufacturing stages:
- The cut pieces of foam are fastened together in any convenient way.
- Light bulbs are inserted into the top lid at intervals of 15 cm. A dedicated heater for the incubator can be purchased. However, light bulbs are quite effective and are the most cost-effective option.
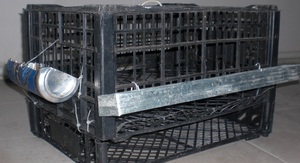
- The tray can be purchased or made from wooden planks. For quail, the mesh size should be 5x5 mm.
- The tray with eggs is placed in the middle of the structure so that the distance to the heating elements is equal to the distance to the container with water.
- It is necessary to leave space between the laid eggs and the walls of the homemade box for air ventilation.
We use an old refrigerator
 Making a device from an old refrigerator is the best option. This is explained by the ability to use multiple chambers and ready-made thermal insulation. The refrigerator is also very convenient to use in cases where if the electricity goes out in the houseYou can simply place a closed container of hot water inside, which will keep the eggs warm for a long time.
All you need to do is make ventilation holes, install incandescent lamps, a fan, trays with water and a thermostat.
Stages of work:
- The freezer and other unnecessary parts are dismantled.
- A window is cut out in the door and sealed with glass.
- The egg trays are secured.
- There are two light bulbs installed at the top of the refrigerator and four at the bottom.
- The gyroscope and thermometer are attached so that they can be seen through the window.
- A container with water is placed at the bottom of the refrigerator.
You can buy it special trays with an egg-turning mechanism and install them into the incubator from the refrigerator. They will make the job easier for those who can't devote sufficient attention to hatching. Furthermore, installing an automatic turning system will minimize the number of openings, which is very important when hatching birds.
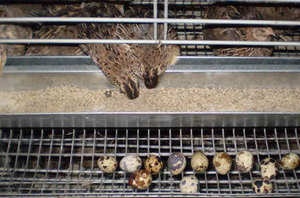
Quail incubator
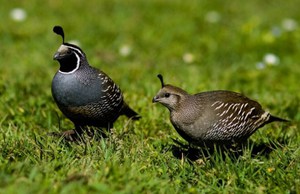
Many poultry farmers are interested in the question of what kind of incubator to use for quail eggs. Designs for this type of bird are made using the same principles. They differ only in size.
A quail incubator should be two to three times smaller than a chicken incubator. A ready-made incubator, which was intended for chickens, three times more quail eggs will fit.
When building an incubator yourself, keep in mind that its assembly requires care and precision. The slightest change in humidity or temperature can lead to egg spoilage.