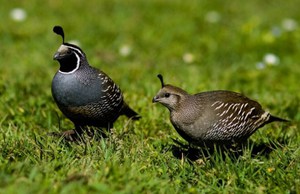
Beginning quail farmers should consider several housing requirements. If you have your own small farm or backyard, you can house the birds in a separate room. It's important to maintain a consistent temperature and lighting conditions in this room. A comfortable temperature for quail is between 20 and 25 degrees Celsius.
Lighting can be both artificial and naturalThe main thing is that it's not too bright. Regardless of whether you'll be keeping the birds in a dedicated room or in your own apartment, you should purchase a sparrowhawk. In our case, we don't buy one; we make one ourselves.
What should the cell be like?
If the arrival of new residents wasn't planned, so as not to leave them homeless, they can initially live in a regular parrot or hamster cage. However, the key phrase is "initially," after some time, you'll need to purchase a new cage or make one yourself.
You can find ready-made solutions designed for raising quail in stores. Homemade quail cages are no better or worse; the only difference is whether you have more time and effort or money.
The cells must meet a number of requirements:
 Dryness. The cage must be dry to prevent the birds from getting sick;
- The mesh size of the cages varies depending on the size of the quails so that they do not fall out of the cage;
- The cage should not be overcrowded; the birds should not be too cramped (on average, 10 birds will require about 14-18 square decimeters of space);
- Quail cages have a number of design features that should not be overlooked (this applies to assembly materials, equipment, and so on).
 Dryness. The cage must be dry to prevent the birds from getting sick;
Also cells are divided into different types depending on the purpose of raising the bird and its age:
- Cages for quails under 10 days old;
- Cages for quails under 45 days old;
- For adults;
- To obtain eggs;
- For fattening for meat.
Regardless of the final goal, the cage must have: drinking bowls and feeders, as well as proper lighting and heating (which is especially important for young quails).
Design and assembly
Having made the final decision to build the cage yourself, you should prepare a drawing that takes into account the size of the cage itself and the room it will be located in. Next, you need to decide on the material, usually mesh, plastic or plywood.
Assembling a cage from a mesh
It can be built with or without a frame. Let's start with the frame option. A mini-farm for 15-20 quail requires a frame measuring approximately 725 x 350 x 200 millimeters. Next, the bottom and sides are attached to it, and the ceiling is installed. Naturally, the size can be adjusted to suit any number of quail and any space.
The sequence of works is as follows:
- We make blocks or corners of the required size. In our example, this means four pieces of 500 mm, four pieces of 300 mm, and three more pieces of 700 mm. The pieces should be connected together according to the drawing (1).
- Next, the netting is disassembled and secured to the finished frame. If the frame is wooden, the netting is attached with nails, but only in a way that prevents the quail from being injured (the nails should be bent or hidden as much as possible within the frame). If the frame is metal, the netting can be attached with wire, eliminating the need for nails or a furniture stapler. It's important to note that the mesh size of the bottom mesh should be 16 x 24 cm. The mesh size of the front mesh should be 32 x 48 cm (to allow the birds to reach the waterers and feeder).
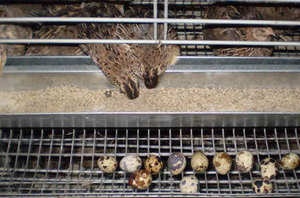
- Since the quails will inevitably start laying eggs, it's necessary to construct an egg collector in the floor. Its design is quite simple; essentially, you need to create a shallow groove in the floor or ensure the entire floor is sloped appropriately. The length should be at least 8 centimeters. When constructing the egg collector, it's important to create a slight slope (up to 5 centimeters) at the end and sides around the perimeter. These design features are essential to protect the quail eggs from damage and falling.
- A door should be mounted in the center of the front wall. Why in the center? The door should be positioned so that you can reach any corner of the cage. The door is made from the same mesh; cut a piece and attach it to the canopy. You can make the canopy yourself from the same wire, bent into a "C" shape.
- Last but not least, a droppings tray is essential. Keeping the cage clean is important both for the quails themselves and for you (to reduce unpleasant odors in the room). A droppings tray is used for this purpose, usually made of metal or plastic, as these materials are the easiest to clean. A sheet of the chosen material is placed in the tray and removed and cleaned as needed. Alternatively, you can line it with newspaper to make cleaning even easier.
 We make blocks or corners of the required size. In our example, this means four pieces of 500 mm, four pieces of 300 mm, and three more pieces of 700 mm. The pieces should be connected together according to the drawing (1).
There are even more simple and affordable assembly methodIf desired, you can assemble a similar cage without using a frame.
In this case, a single sheet of mesh (with a large mesh size) is taken, folded at the corners, and secured with clamps. The mesh is folded according to the drawing (2). The side pieces are secured separately, and an additional sheet of fine-mesh mesh is placed on the bottom.
Assembling a plastic cage
This material is not yet so widespread, and This cage looks unsightly.However, it has a number of undeniable practical advantages when compared to wooden and mesh counterparts.
- Firstly, such a cage will last much longer; plastic is much less susceptible to various types of damage and does not wear out like mesh.
- Secondly, plastic is much easier to clean than wood.
- Thirdly, there is constant visual control over your charges.
 Firstly, such a cage will last much longer; plastic is much less susceptible to various types of damage and does not wear out like mesh.
For assembly, you'll need a hacksaw, two short vegetable boxes, and one tall vegetable box (about 20 centimeters tall). It's important that the boxes match in size around the perimeter.
The sequence of works is as follows:
- We remove all protruding edges on the boxes. This is done using a hacksaw (cutting off the top corners of each box);
- We install the pallet (one small box), then the central part (a large box) and the roof (another small box) on top of it. The finished structure is fastened with wire;
- A hole can be cut in the top drawer for a door;
- Additional slits are made in the walls to allow the quails to get to food and water.
- A drinking bowl and feeder can also be made from improvised means, for example, a plastic bottle cut lengthwise.
An example of such a cell can be seen with one’s own eyes in the photo (1).
Organization of a cellular battery
If you've finally gotten the hang of it and one cage isn't enough, then building a battery cage is for you. The idea is that if you need to install multiple cages, it's best to stack them on top of each other. This approach significantly minimizes wasted space and also allows for easier access to the quail.
At the same time the following conditions must be met:
- In no case should you go overboard with the number of floors; aim for a maximum of 3 or 4.
- The distance between the first floor and the floor should be at least 80 centimeters. This will protect the quail from drafts.
- Even the smallest battery cage must be securely fastened. Mounting it against a wall is ideal.
 In no case should you go overboard with the number of floors; aim for a maximum of 3 or 4.
Instead of a conclusion
Breeding quails, like any other animals, is a troublesome business, but any work is rewardedSo, you too will be rewarded with a useful product, financial gain, and, most importantly, the positive experience of interacting with quail.